TortoiseGit Manual
As you work on a project, you will eventually need to manage files or folders, i.e. delete, copy, rename, or move them. TortoiseGit provides support for such operations. They are available from the context menu of versioned files (and folders) and are described in more detail in the following subsections.
Git only tracks content
Unlike Subversion and other version control systems, Git does not track file names. Git only tracks the contents of files and, therefore, it is not necessary to explicitly record copies, renames or moves. So there is generally no need to use Git's rename or remove functionality or even to "repair renames" as in Subversion. Renames and copies are automatically detected when you view the log. Nevertheless, adding (cf. the section called “Adding New Files”) and removing files from version control need to be recorded.
Cannot copy between repositories
Whilst you can copy and files and folders within a repository, you cannot copy or move from one repository to another while preserving history using Git or TortoiseGit. Not even if the repositories live on the same server. All you can do is copy the content in its current state and add it as new content to the second repository.
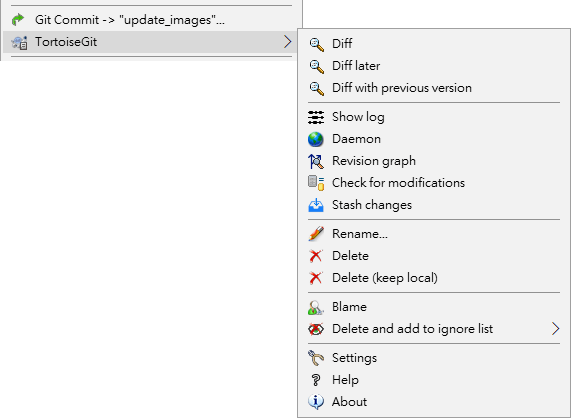
Use → to remove files or folders from Git.
When you use → on a file, it is removed from your working tree immediately as well as being marked for deletion in the repository on the next commit (i.e., the file is removed from the Git index). When you perform this action on a folder, all files/folders will be removed recursively. Up until you commit the change, you can get the file back using → on the parent folder or use the commit (cf. the section called “Committing Your Changes To The Repository”) or status (cf. the section called “Getting Status Information”) dialogs.
If you want to delete an item from version control, but keep it locally as an unversioned file/folder, use → . There also is a special command for deleting an item and adding it to the ignore list ( → , cf. the section called “Ignoring Files And Directories”). You may have to hold the Shift key while right clicking on the item in the explorer list pane (right pane) in order to see these options in the extended context menu.
If a file is deleted via the explorer instead of using TortoiseGit's context menu, the commit dialog (cf. the section called “Committing Your Changes To The Repository”) and status (cf. the section called “Getting Status Information”) dialogs will show the file as missing. Missing files are also automatically marked as deleted on commit when they are selected, but explicitly deleting a version-controlled file using → may make your intention on commit more clear while your are preparing the commit.
Getting a deleted file or folder back
If you have deleted a file or a folder and already committed that delete operation to the repository, then a normal → can't bring it back anymore. But the file or folder is not lost at all. If you know the revision the file or folder got deleted (if you don't, use the log dialog to find out) open the repository browser and switch to that revision. Then select the file or folder you deleted, right-click and select → . Refer to the section called “The Repository Browser” and the section called “Log Dialog” to find out more.
It often happens that you already have the files you need in another folder in your repository. As Git only tracks content, simply copy the items across your working tree and mark them as added or select them while committing (cf. the section called “Adding New Files”).
In order to get older versions of a file you can use the repository browser or the log dialog to locate content you want, and copy (or drag and drop) it into your working tree directly from the repository. Refer to the section called “The Repository Browser” and the section called “Log Dialog” to find out more.
If you want to do a simple in-place rename of a file or folder, use → Enter the new name for the item and you're done. You can move an item around in the whole working tree, i.e., the name may start with ..\ to move a file upwards in the folder structure. Use the to open a file chooser dialog which automatically generates the correct destination name.
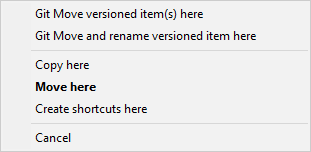
The easiest way to move files and folders from within a working tree is to use the right-drag menu:
Select the files or directories you want to move
right-drag them to the new location inside the working tree
release the right mouse button
in the popup menu select →
Since Git only tracks content and not filenames, you could also simply move/rename files in Explorer. But then you have to mark the old file as deleted, and mark the new file as added separately later (at the latest during commit).
Moving Submodules
Moving Submodules (git-submodule(1) man-page) using TortoiseGit's Move and Rename commands should work. There are, however, notes for the used git-rm(1) man-page command (cf. git-rm(1) man-page).
Making case-only changes to a filename needs special attention, because Windows does not honor the filename casing by default. Therefore just renaming a file using the rename command of the Explorer is likely not to work. It is important to rename it using Git in order to update the index to make it use the new filename. Use the command in the TortoiseGit submenu.
If the repository already contains two files with the same name but differing only in case (e.g. TEST.TXT and test.txt), you will not be able to commit, and only one of them can be checkout on a Windows client. Whilst Git (in general) supports case-sensitive filenames, Windows does not.
This sometimes happens when files are committed from a system with a case-sensitive file system, like Linux, or when the setting core.ignorecase is set to false (cf. git-config(1) man-page).
In that case, you have to decide which one of them you want to keep and delete the other(s) from the repository (or rename the other(s)). Easiest way is to do that on a case-sensitive file system, followed by committing and pushing the changes. Doing it on Windows requires several steps (and two commits):
Solution
Delete the file in explorer.
Caution
Do NOT use the or the command in the TortoiseGit submenu!
Open the Commit dialog. (All the checked items are of
Deletedstatus.)Uncheck only one item you want to keep.
Commit the changes.
Revert deletion of the wanted file in order to get it back. If you want to keep both or more files which had the "same" name, but with a different new name, do this for all files in question and rename them before proceeding with the next file.
Usually you set your ignore list such that all generated files are ignored in Git. But what if you want to clear all those ignored items to produce a clean build? Usually you would set that in your makefile, but if you are debugging the makefile, or changing the build system it is useful to have a way of clearing the decks.
TortoiseGit provides just such an option using → . You may have to hold the Shift while right clicking on a folder in the explorer list pane (right pane) in order to see this in the context menu. This will show a dialog which lists all possible clean up options (cf. the section called “Cleanup”).