TortoiseGit Manual
For open source projects (like this one) everyone has read access to the (main/public) repository, and anyone can make a contribution to the project. So how are those contributions controlled? If just anyone could commit changes to this central repository, the project would be permanently unstable and probably permanently broken. In this situation the change is managed by submitting a patch file or a pull request to the development team, who do have write access. They can review the changes first, and then either submit it to the main repository or reject it back to the author.
Patch files are simply Unified-Diff files showing the differences between your working tree and the base revision.
A pull request is an request to another repository owner to pull changes from your repository. I.e. you must have access to a public repository where you can push your changes (normally a special branch).
First you need to make and test your changes. Then you commit your changes via → on the parent folder, enter a good commit message. After that select → and choose the correct options to include your changes/commits.
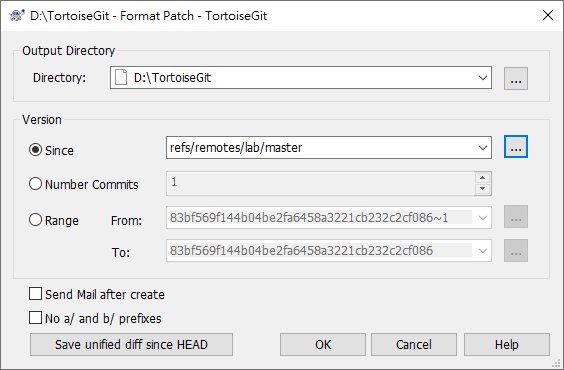
Directory is output directory of patch. Patch file name will be created by commit subject.
Since create patch from point. You can click to launch reference browser dialog to choose branch or tag (cf. the section called “Browse All Refs”).
Number Commits is limited how much patch will created.
Range is choose range of from commit to to. You can click to launch log dialog to choose commit.
Send Mail after create launch send mail dialog after patches created (see the section called “Sending patches by mail”).
You can find more information at git-format-patch(1) man-page.
Important
Here Git is different to TortoiseSVN: In TortoiseSVN you directly create a patch instead of committing your changes and create a patch of the commits afterwards (in git you have a full local copy/fork of the project you cloned - commits are just local). To generate a patch containing the uncommitted, but staged, changes click on .
For hints where to find more information about doing version control with Git see the section called “Reading Guide”.
In order to send patches to the upstream authors, select the patch files and then right click on them and select →
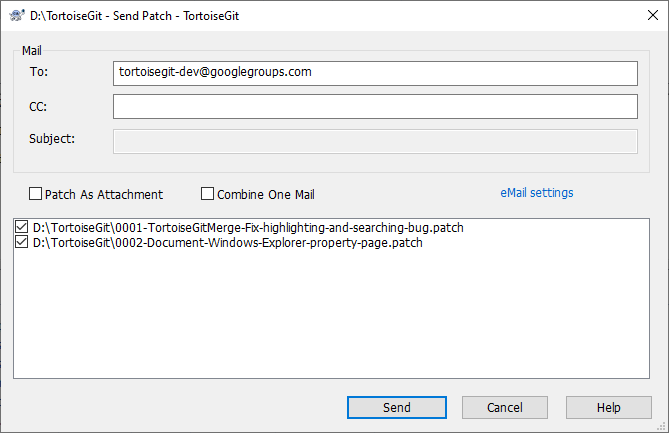
First you need to enter the recipient(s) (To and/or CC).
Depending on the mail type (Patch as attachment or Combine One Mail) you have to enter a Subject for the mail.
Patch as attachment adds the patch(es) as attachment(s) to the mail(s) instead of inlining them.
Combine One Mail adds all patches to one mail. You have to enter a Subject for the mail in this case.
Patch files are applied to your working tree. This should be done from the same folder level as was used to create the patch. If you are not sure what this is, just look at the first line of the patch file. For example, if the first file being worked on was doc/source/english/chapter1.xml and the first line in the patch file is Index: english/chapter1.xml then you need to apply the patch to the doc/source/ folder. However, provided you are in the correct working tree, if you pick the wrong folder level, TortoiseGit will notice and suggest the correct level.
From the context menu for a patch file (.patch or .diff extension), click on → You might be prompted to enter a working tree location:
If the working tree is found, TortoiseGitMerge is launched to show and apply differences.
Patch files are applied to your working tree. For this copy the patch (or mbox) files to the root of your working tree.
From the context menu for that folder (or all marked patch files), click on →
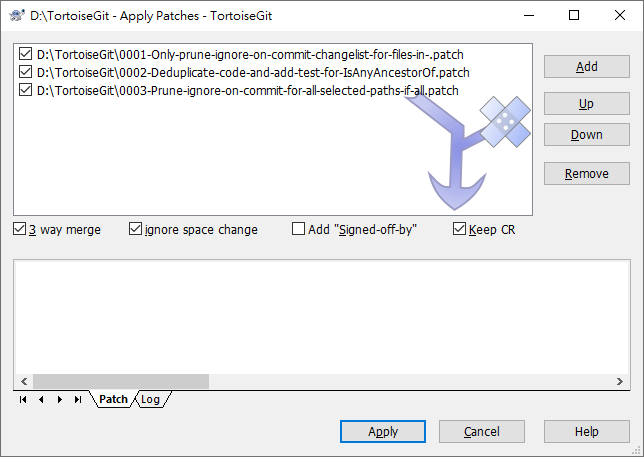
Insert patch
Move chosen patch up.
Move chosen patch down.
Remove the chosen patch.
Start applying the patches one by one.
You can find more information at git-am(1) man-page.
Apart from sending patches (or patch serials) to other developers, there are two ways to ask other people to integrate your changes into their repositories.
First: After pushing your changes to a (public) repository, you just provide other people the URL of your repository and the name of the branch or the revision id. E.g.: git://example.com/repo.git BRANCHNAME
Second: After pushing your changes to a (public) repository, you can create a standardized (quite formal) request for other people to pull your changes and integrate them into their repository. The format pull request consists of a list of all commits and provides some statistics about changed files, so that other people can get a quick overview.
Select on the progress dialog after pushing your changes.
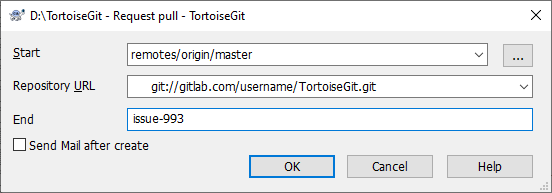
- Start
This should be the revision on which your changes are based on.
- URL
The public URL to your repository, which can be access by the people who shall pull your changes.
- End
This should be the branch name or revision id of the end of your commits.
After clicking on the pull request is created. Just copy it and pass it to other people who you want to pull your changes.
You can find more information at git-request-pull(1) man-page.